consumer week special offer

Hours
Minutes
Seconds

FlutterFlow X Bubble X WeWeb | Best Tool to create apps nocode

Thumb Articles Blog 6

Estimated reading time: 8 minutes


Introduction to No-Code Tools

Have you ever thought about creating an app without needing to understand programming? Do you want a tool that fits perfectly into your project and is easy to use? If yes, you are in the right place. Here, we will explore what the best tool to create apps for your project, who can transform your idea into a real product simply and effectively.

Best Tool to create apps

Let's talk about three giants of the no-code industry: FlutterFlow, Bubble and WeWeb. These platforms offer incredible solutions for those who want to create native or web applications apps. Furthermore, we will discuss how you can use these tools to assemble complex logic and integrate different databases without a headache. Imagine creating projects visually, saving time and money. Are you curious? Keep reading to find out which tool is right for your next project!

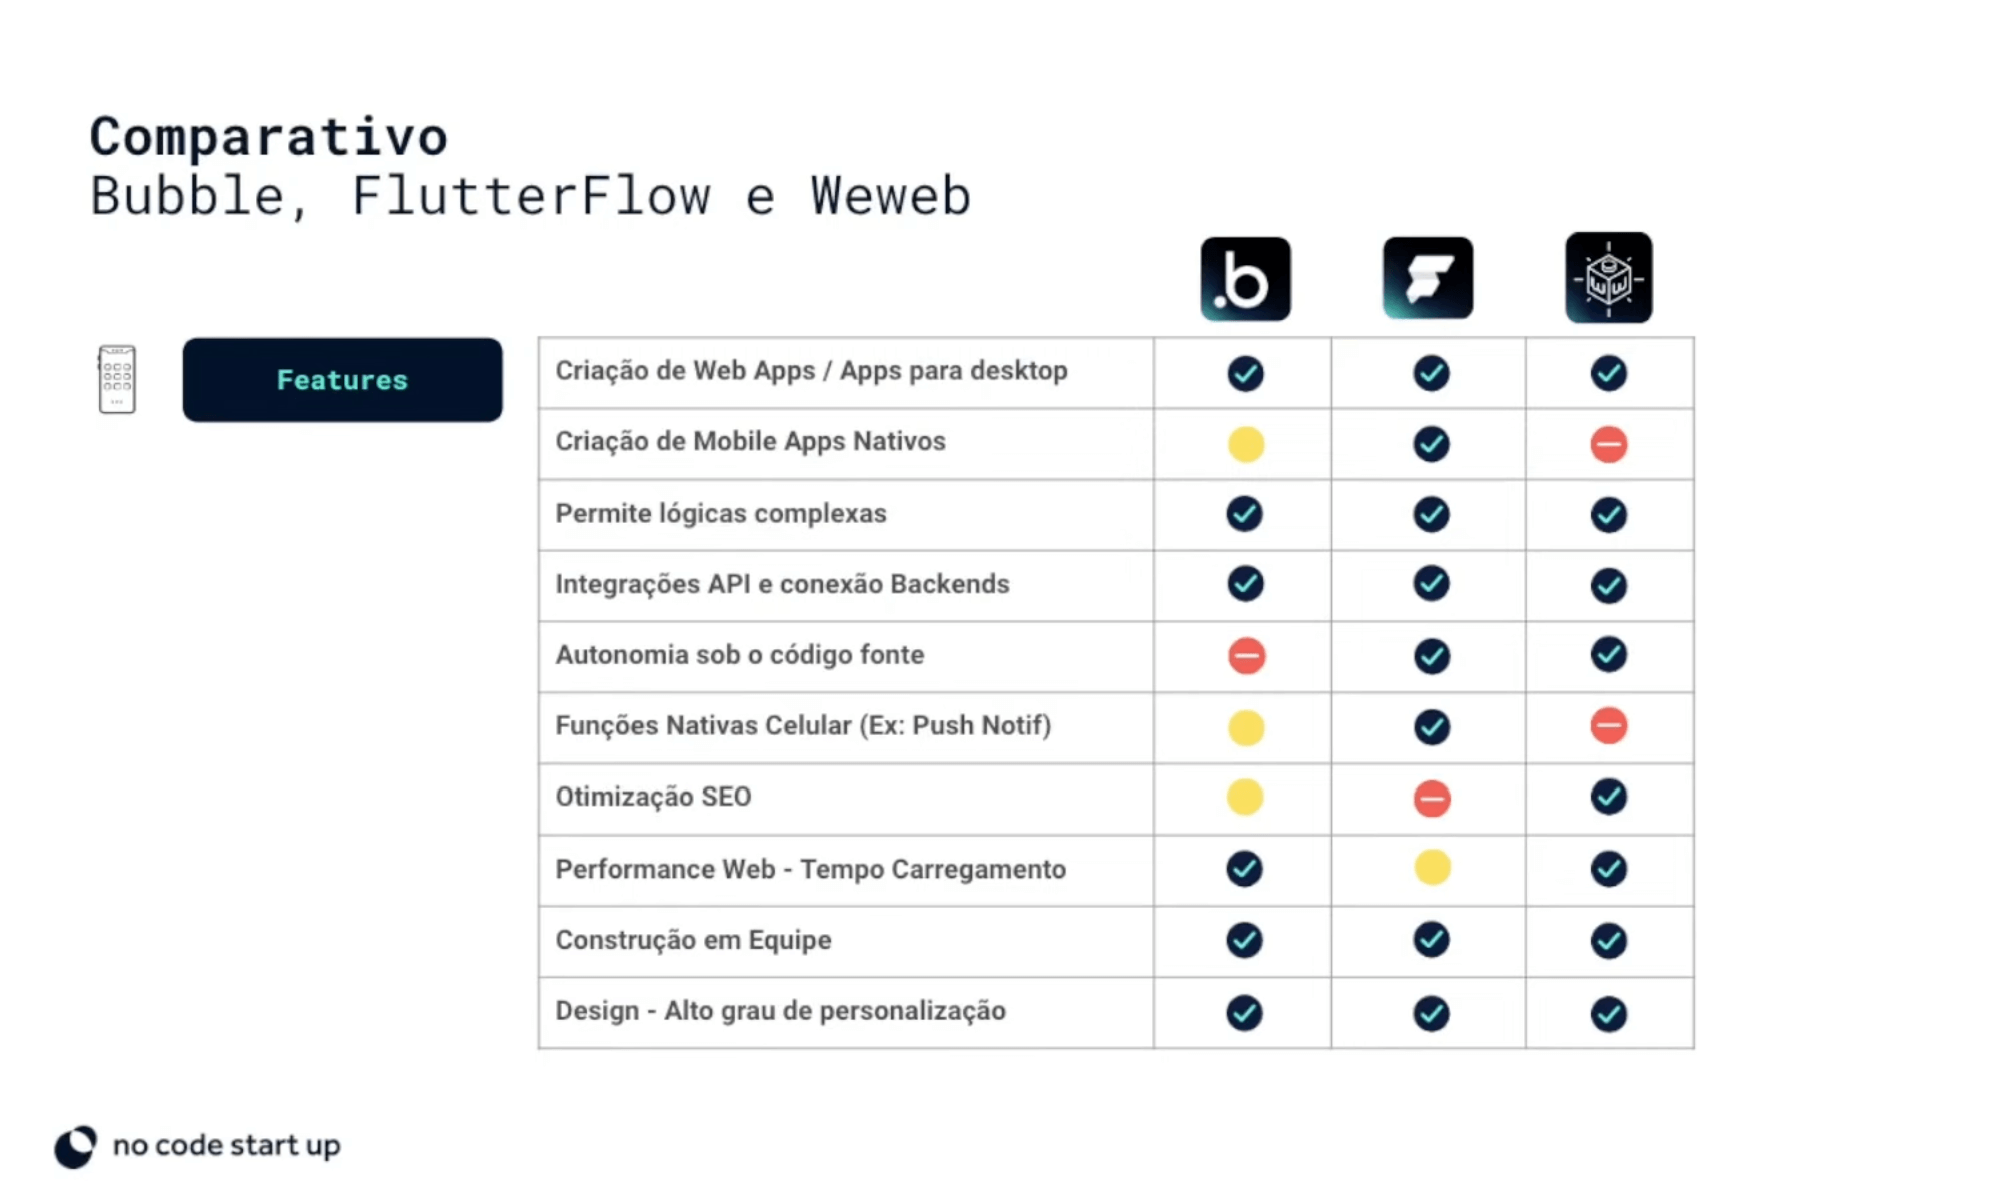
Comparing Features: FlutterFlow, Bubble and WeWeb

Exploring the best tool to create apps without typing a line of code is a great opportunity. I'll tell you about three popular tools: FlutterFlow, Bubble and WeWeb. Each has its own strengths and may be better depending on what you need.

  • FlutterFlow – Flexibility and Control: If you want to make apps that works on both your phone and computer, FlutterFlow is a great choice. It allows you to create applications visually and even gives you access to the source code. This is great because you can adjust the details however you want, giving your project more personality.
  • Bubble – Ideal for Beginners: Bubble is perfect if you're just starting out. It brings together the design of the app and the system behind it (back end), all in one place. This simplifies things a lot. Currently, Bubble is focusing more on apps for the internet, but is already venturing into apps for cell phones as well.
  • WeWeb – Superior Performance: For those who need a website that loads quickly and runs smoothly, the WebWeb is the right choice. He specializes in creating high-performance websites, ensuring an excellent user experience. Furthermore, it easily connects to databases, which allows you to create more complex functionalities without difficulties.

Choosing between FlutterFlow, Bubble and WeWeb depends on the type of app you want to create and what's most important to you, be it full control over the design, ease of use or performance. Each of these tools has something special to offer and could be the missing piece for you to get your project off the ground.

Advantages of FlutterFlow for Native and Web Applications

FlutterFlow has been gaining prominence as a tool innovative and affordable way to create apps without needing to program. If you're thinking about building an app, whether for a business, a personal project or even to test an idea, FlutterFlow could be the perfect choice. Let's see why:

  • Platform Flexibility: With FlutterFlow, you can create applications that work on both cell phones and computers. This means that it doesn't matter if your user is on their phone on the bus or on their laptop at home, the experience will always be good.
  • Extreme Customization: This tool gives you the freedom to make the app your own. You can adjust everything from the layout to the colors and features, ensuring the end result is exactly what you imagined.
  • Simplified Integrations: FlutterFlow makes it easy to connect your app to various tools and services. This means that you can, for example, add payment systems, data analysis or social media features quickly, enriching your application without complications.

When you choose FlutterFlow, you are choosing a tool that not only simplifies app development, but also opens up a world of possibilities for customizing and integrating your project with other platforms. This combination of ease, flexibility and power makes FlutterFlow an excellent option for anyone who wants to turn ideas into reality quickly and efficiently.

Bubble: Ideal for Learning and Developing Web Apps Quickly

Bubble is a fantastic platform for anyone who wants to start developing applications without worrying about complex code. Imagine you want to build an app, but you don't know how to program or you simply want to speed up the process. That's where Bubble comes in, with a simplified and very intuitive approach.

  • User-friendly Interface: The platform is uncomplicated and designed for anyone to use. Even if you've never programmed before, Bubble makes it easy to understand through a “drag and drop” interface. This makes the process fun and accessible.
  • Complete Integration: With Bubble, you take care of the look and logic of your app in the same place. This means less headaches and more efficiency as you don't have to switch between different tools for the front end and back end.
  • Agile Development: The platform allows you to quickly create complete applications. Bubble offers a range of pre-defined functions that you can add to your project just by selecting and positioning where you need them. This is ideal for prototyping ideas and testing concepts without wasting time.

Bubble is ideal for beginners and also for entrepreneurs who need a solution quickly and effectively to create applications. With it, you can turn your ideas into reality without delving into the technical details of programming. This tool opens doors so you can focus on what really matters: the design and functionality of your app.

WeWeb: High Performance in Web Applications

Have you heard of WebWeb? If you're looking for a tool to create incredible websites, you'll definitely want to know more about it. WeWeb stands out a lot when it comes to practicality and performance in web projects. Let's better understand why this is.

  • Simple integration: One of the great advantages of WeWeb is how it makes it easy to integrate your project with various databases and external services. This means less headache to configure and more time to create interesting features.
  • Cutting-edge performance: WeWeb guarantees that your website will not only function well but also load quickly. This is essential nowadays, where users' patience for slow websites is practically zero.
  • Complexity without complication: If your project requires a lot of customization and more complex integrations, WeWeb offers the right tools. It allows you to manipulate data in an advanced way without needing to be a programming expert.

Choosing WeWeb means invest in quality and efficiency. It is robust enough to handle high technical demands, but simple enough for anyone to use. It's a tool that perfectly balances power and usability, making it a great choice for any web project.

"

Conclusion: Choosing the Best Tool to Create Apps

How about getting your hands dirty and starting to use what you learned about no-code tools today? Choose the right tool It can be a game changer for your project. Don't be afraid to experiment and find the one that best fits your needs. Each tool has its peculiarities and, certainly, one of them can offer exactly what you need to get your idea off the ground and transform it into a functional application or website.

NoCode StartUp not only teaches, but also inspires to create. When you learn about FlutterFlow, Bubble, WeWeb and other no-code technologies with us, you gain the freedom to develop your own solutions, without relying on complex programming. Imagine the possibilities: creating a business, launching an app, all with the security of having learned from someone who understands the subject. What's more, with the integration of artificial intelligence, your creations will always be at the forefront of technology.

Finally, remember that every step you take in the no-code universe is a learning experience. Explore without fear: Test different platforms, apply new ideas, and watch your creations come to life. We are here to support you on this journey. Let's innovate together and break down barriers, transforming ideas into reality with creativity and efficiency. Are you ready to get started? 

org

Watch our Free MasterClass

Learn how to make money in the AI and NoCode market, creating AI Agents, AI Software and Applications, and AI Automations.

No-Code Start-Up

Also visit our Youtube channel

Learn how to create AI Applications, Agents and Automations without having to code

More Articles from No-Code Start-Up:

If you are looking for a Free AI Agent Course for Beginners, you have come to the right place! After all, we are in the era of automation and artificial intelligence. In this context, companies and professionals are looking, above all, for intelligent solutions to optimize processes. In addition, they are looking to reduce costs and, consequently, improve the user experience.

In this context, AI agents stand out for their ability to automate complex tasks, interact naturally with users and integrate multiple systems without the need for constant supervision.

Continue reading this article and discover how the Free AI Agent Course can transform the way you work with artificial intelligence. Understand why AI agents are so powerful and learn how to start creating your own agent from scratch, using accessible and efficient tools, without needing any programming experience. Enjoy your reading! 

find out how the agents course is structured

From Zero to AI Agent: Learn how it works Free AI Agent Course for Beginners

If you want to learn for free and create your own AI Agent, the first step is to learn about the structure of the Free AI Agent Course for Beginners from NoCode Startup. If you want to start from scratch and develop your own Artificial Intelligence Agent, this content was made for you, in a complete material you will learn: 

  • fundamentals of Artificial Intelligence Agents to build a solid foundation;
  • a step-by-step guide to creating practical agents, even without prior experience;
  • how to use N8N to implement smart automations efficiently;
  • integrations with platforms such as Telegram, enabling the creation of interactive and dynamic agents.

Remember that the AI Agent course was developed so that anyone, even without prior programming knowledge, can create intelligent and scalable solutions. In other words, even if you have never programmed before, you can start without fear!

Why are AI agents so powerful?

Before understanding how to create your own AI Agent, it is essential to understand why these tools have become indispensable in different sectors. Therefore, it is worth reflecting: why is the use of these solutions growing so much? How do they impact the efficiency of processes?

Furthermore, understanding these aspects can reveal new opportunities for optimization and growth.

1. Integration with custom data (RAG)

why are ai agents so powerful rag

One of the main reasons for the power of AI agents lies in the technique known as RAG (Retrieval-Augmented Generation). This methodology allows the AI model to be combined with personalized user or company data. This means that the agent can be trained to access specific information from:

  • PDF files;
  • corporate websites;
  • spreadsheets and databases;

Through this customization, the agent becomes able to perform advanced queries, access specific documents and respond accurately based on the available information. 

2. Ability to execute actions (Function Calling)

why are ai agents so powerful function calling

In addition to RAG, another distinguishing feature of AI agents is the function called Function Calling (or tools), which allows the agent to not only analyze data, but also perform actions on different platforms. For example, among the main functions, the following stand out:

  • access and edit the calendar (schedule meetings, check events);
  • send, read and reply to emails;
  • interact with spreadsheets and databases (consult and update information);
  • perform direct tasks via corporate applications.

This capability turns the agent into a true virtual assistant. Imagine being able to send a simple message on WhatsApp, and the agent automatically accesses different systems, queries databases and sends comprehensive reports, all without direct human interaction.

Learn how to create AI Agents for different businesses

learn how to create IA agents for different businesses

AI agents aren’t limited to basic tasks or simple interactions. In the Free AI Agents for Beginners Course, you’ll master tools like RAG and Function Calling and learn how to create intelligent solutions for different industries, without needing technical experience and without paying anything!

Scheduling agents, for example, can automate appointment scheduling, eliminating the need for direct human interaction. Key application examples include:

  • medical consultations: the agent checks available times, schedules the appointment and sends confirmation to the patient;
  • barbershops and beauty salons: the agent manages the professionals' schedule and allows clients to choose times directly via WhatsApp or Instagram;
  • classes and events: Want to schedule an adventure class or special event? The agent automates the process and confirms details with participants;
  • restaurants and snack bars: the agent acts as an intermediary between the customer and the establishment, optimizing orders and integrating with the restaurant system;
  • e-commerces: manage orders, inventory and customer service in an automated way, using agents integrated with the main sales platforms;
  • veterinary clinics: allow appointment scheduling, vaccination control and automatic notifications for customers;
  • gyms and studios: the agent manages class reservations, waitlists and sends automatic reminders to students.

Understand the Architecture of an AI Agent

Creating an AI Agent is more than just programming a chatbot. It’s about developing an intelligent, autonomous solution that transforms processes!

To do this, it is essential to understand the architecture that supports these agents, ensuring that they are capable of performing complex tasks, interacting with different platforms and delivering accurate and contextualized responses.

Below, learn more about this framework and how each component contributes to the advanced performance of AI agents.

  • Input Layer: where the agent receives information from the user through different channels (WhatsApp, Instagram, email or website), whether in text, voice or specific commands;
  • natural language processing (NLP): responsible for interpreting messages, understanding intentions and extracting relevant information, such as dates, times and user preferences;
  • connectors and APIs (Function Calling): allow the agent to perform real actions, such as checking available times, consulting menus or accessing internal systems, through external integrations;
  • RAG (Retrieval-Augmented Generation): combines natural language generation with external data retrieval, allowing the agent to search for information in databases or on the internet in real time before responding;
  • decision making and automation: After processing the information, the agent performs actions such as scheduling appointments, forwarding orders or sending notifications;
  • real-time feedback: keeps the user informed about the status of the service, sending automatic updates at each stage of the process.

N8N: The most complete tool for creating AI agents

n8n complete tool to create AI agents

Creating AI agents goes far beyond just setting up simple bots. There are robust tools on the market that allow you to build complex, interactive, and fully automated agents. Choosing the right tool makes all the difference in the performance and possibilities of your project.

In this way, the N8N stands out for integrating two essential worlds: advanced automation and creation of AI agents. 

Originally designed for complex automation, the platform has evolved and today offers a powerful framework for creating intelligent and scalable agents. Among the main differentiators of N8N are:

  • creation of complex automations and integrations on a single platform;
  • integration with multiple AI models such as GPT, Llama, Claude and Gemini;
  • ability to host the system on your own servers, reducing costs;
  • intuitive interface with support for the “No-Code” concept, ideal for beginners'
  • integration with external tools such as calendars, spreadsheets, emails and databases.

Additionally, N8N offers a visual interface for creating automation flows, making the job easier even for those with no prior programming experience. And best of all, you can take a 14-day free trial with credits included to use OpenAI's resources.

OpenAI: Simplicity and Scalability

OpenAI offers one of the most robust solutions on the market, enabling the creation of powerful AI agents through the use of GPT models (such as GPT-4). 

With a simple-to-use API and excellent documentation, OpenAI has become a reference for developers who want to create scalable agents with high processing capacity. Among its main advantages are:

  • pre-trained models with high natural language understanding capacity;
  • easy integration with platforms like N8N;
  • scalability for projects of all sizes;
  • support for techniques such as RAG and Function Calling;

Dify: Open source and total flexibility

Dify stands out for being 100% open source, allowing developers to have complete freedom to adapt the agent according to their needs. Dify's main features are:

  • open source, allowing complete customizations;
  • possibility of hosting on own servers, reducing expenses;
  • broad integrations with databases, APIs and external tools;
  • simplicity in training custom agents with specific data.

But how do you choose the ideal tool? Choosing the ideal tool will depend on your goals and the level of complexity of your project:

  • If you are looking for something practical and scalable, OpenAI may be the best choice;
  • for those who need advanced automations and complex integrations, N8N stands out;
  • If the focus is total freedom of customization and an open source solution, Dify is perfect.

And if your goal is to create complex automations with multiple integration points, N8N is the best choice. Its ability to combine automations with AI and the possibility of self-hosting make it one of the most powerful tools on the market.

Time to get your hands dirty: learn how to create your first AI Agent

time to get your hands dirty learn how to create your first AI agent

If you've followed the Free AI Agent Course for Beginners | From Zero to AI Agent, it's time to put everything you've learned into practice! In this step, I'll guide you through the process of creating your first AI Agent, using accessible and efficient tools, such as N8N, OpenAI and Dify. Ready? Let's go! 

1. Step 1: Defining your AI Agent front-end

The front-end is the interface of your project, the point of contact where the user interacts with your agent. In this content, we will use Telegram for its simplicity and versatility. Although it is possible integrate WhatsApp, this platform's API demands more complex processes.

So, for beginners, Telegram is the best choice. Later, you can explore the integration with WhatsApp.

2. Creating the Agent in N8n

N8N will be the main automation tool in your AI Agent. With it, you can create complex workflows without the need for advanced programming. Follow the steps below to get started:

  • create your free account on N8N with a 14-day free trial and credits to use the OpenAI API;
  • access the N8N panel and configure your credentials;
  • create a new workflow by clicking on “Start from scratch”;
  • choose your first trigger (e.g.: message received on Telegram);
  • add the “AI Agent” node and connect to the OpenAI GPT model.

3. Expanding the functionalities

Now that your basic AI Agent is up and running, it's the perfect time to enhance its capabilities, making it even more efficient and versatile! 

Learn how to add advanced functionality that allows your agent to interact with different types of data, integrate new platforms, and provide a richer user experience.

1. Adding memory layer (WindowBufferMemory

For your AI Agent to have the ability to remember information during a conversation and maintain context between messages, it is essential to add a memory layer.

 The implementation of WindowBufferMemory in N8N allows the agent to store recent interactions, ensuring more accurate responses aligned with the context of the dialogue. To implement, follow the steps below: 

  • In N8N, add the WindowBufferMemory node to your agent flow.
  • configure the following parameters:
    • Window Size: define the number of messages the agent should remember (e.g.: 5 previous interactions);
    • storage method: For temporary storage, use N8N's default storage. For long-term storage, integrate with databases like Redis or Supabase;
  • Connect the WindowBufferMemory node to your AI Agent node so that the agent uses the history when generating responses.

To make the implementation clearer, imagine the following scenario: the user asks “What’s my appointment tomorrow?” and then simply writes “What about Friday?”. 

Even without repeating the full question, the agent understands that the context is still about commitments and provides the correct answer. 

Now that the agent is prepared to store contextual information, you can explore additional integrations and enhance its functionality, creating a more robust and efficient flow.

2. Integration with multiple tools (Function Calling)

To take your AI Agent to the next level, allow it to interact directly with other platforms and perform complex tasks. With Function Calling, the agent not only answers questions, but also performs practical actions across different systems. Key features you can integrate include:

  • Google Calendar: automatically schedule and list events;
  • Spreadsheets (Google Sheets/Excel): add, remove or search data in real time;
  • Email (Gmail/Outlook): send personalized automatic emails;
  • External APIs: perform queries on third-party services, such as weather forecasts, currency quotes or traffic information.

To set up these integrations, follow the steps below:

  • in N8N, add the node corresponding to the service you want to integrate (e.g. Google Sheets or Google Calendar);
  • In AI Agent, use the Function Calling function to enable the execution of automatic actions when certain commands are detected;
  • Create specific prompts to activate each tool, ensuring that the agent understands the user's requests. Practical examples:
    • “schedule a meeting for tomorrow at 2pm.”
    • “add the client João Silva to the contact spreadsheet.”
    • “send a confirmation email to [email@example.com].”

In this way, the agent becomes not only an intelligent assistant, but also an executor of complex tasks, expanding its functionalities and delivering a much richer and more dynamic experience to the user.

3. Implementing sentiment analysis

You can also enhance your AI Agent’s communication by empowering it to interpret the emotional tone of user messages and adjust its responses accordingly. This ability creates a more humanized, empathetic, and contextualized interaction. 

To do this, follow the steps to implement sentiment analysis:

  • in N8N, add the Text Analytics node or use external APIs like Google Natural Language or IBM Watson;
  • connect the node to the main flow of the agent, right after receiving the user's message;
  • configure the node to identify emotions such as happiness, anger, sadness, or neutrality;
  • In the AI Agent node, create branches in the flow to adapt the agent's responses based on the identified sentiment.

If the user types, “I’m very frustrated with the service,” the agent might respond with more empathy: “I’m sorry to hear that! I’ll do my best to help you resolve the issue as quickly as possible.”

This way, the agent becomes more attentive, improving the user experience and strengthening the bond of trust.

4. Transforming audio into text (Speech-to-Text)

You can also expand your AI Agent’s accessibility by enabling it to understand voice messages. Speech-to-Text functionality allows the agent to transcribe audio into text and interact normally with the user. 

To enable audio transcription in N8N, follow these steps:

  • add Telegram Get File node to capture the audio file sent by the user;
  • connect the node to OpenAI's Whisper API or Google Speech-to-Text to perform audio-to-text transcription;
  • send the transcribed text to the AI Agent node so that the agent can process and respond to the command normally.

With voice message understanding enabled, the user can send an audio message saying: “Schedule a meeting with Pedro tomorrow at 10 am.”
The agent transcribes the audio and executes the action on the calendar, ensuring a fluid and efficient interaction.

This functionality expands the agent's possibilities of use and creates a more dynamic service experience.

5. Automatic notifications and real-time alerts

How about taking your AI Agent to a new level of efficiency with RAG (Retrieval-Augmented Generation), allowing it to search for data from external sources before generating responses? With this technique, the agent provides updated information and contextualized responses. To do this, follow these steps to configure RAG:

  • in N8N, add the integration node with databases, external documents (PDFs) or public APIs;
  • In the AI Agent prompt, instruct the agent to query external sources before generating a response to the user;
  • test the agent with questions that require consultation in external databases.

By adding this automation, your AI Agent gains the ability to send personalized reminders like “You have a meeting scheduled for tomorrow at 9am.”, important announcements like “There’s been a change to Friday’s event.”, and strategic promotional messages like “Unmissable offer! Up to 30% off today.”

With RAG, the agent stops being just a text generator and becomes an intelligent, real-time query tool, ideal for corporate, educational and financial sectors.

 6. Implementing RAG (Retrieval-Augmented Generation)

Finally, you can take your AI Agent to the next level of efficiency by implementing RAG. To set up RAG on N8N, follow these steps:

  • add the integration node with databases, external documents (such as PDFs) or public APIs;
  • configure the AI Agent prompt to instruct it to perform external queries before formulating the response to the user;
  • take practical tests with questions that require searching for data in real time, such as:
    • “What was the revenue from the last quarter?” (consulting a database);
    • “What is the dollar rate today?” (using financial APIs).

This feature is especially useful in corporate, educational, and financial environments where decision-making depends on accurate, timely data.

4. Testing and adjustments

Now that your agent is up and running, it’s time to test it and tweak any details to improve its performance. You can use a testing checklist to check if your agent is working properly:

  • Is the agent receiving messages correctly?
  • does it respond based on the prompt instructions?
  • Can you create and list events in the calendar?
  • Are the answers clear and accurate for the user?

If the agent is returning incorrect information, adjust the prompt to better guide responses. You can also use N8N's execution history to identify failures and test the agent with different commands to validate its flexibility.

Conclusion 

By now, you’ve probably realized that creating AI Agents isn’t just a technological trend, right? Quite the opposite, it’s a real opportunity to explore new markets, automate processes and, above all, boost business in a strategic and efficient way.

Whether to improve the customer service, optimize internal flows or create scalable SaaS solutions, agents offer versatility and scalability for professionals and companies.

The best thing of all is that with No Code tools Like N8N, anyone can start this journey, even without prior programming experience. The combination of techniques such as RAG and Function Calling allows you to create powerful agents, capable of acting in different sectors and solving complex problems.

Now is the time to learn for free and get your hands dirty! In the Free AI Agent Course for Beginners, you start from scratch and create your own intelligent agent, ready to automate tasks and generate business opportunities.

If you want to delve even deeper into this content and master the best strategies for developing efficient and monetizable agents, access the full course Free AI Agent Course for Beginners 2025 | From Zero to AI Agent available on our YouTube channel.

Start your journey now by creating smart solutions that can transform your career and generate new income opportunities.

The WhatsApp API is one of the main solutions for companies that want to scale their customer service and communication automation. 

WhatsApp, being one of the most popular messaging apps in the world, allows direct and efficient interactions with customers. However, when it comes to automation and integration, using the WhatsApp API becomes essential.

So, there are two main options for this integration: the Official WhatsApp Business API and the Unofficial APIs. But which one should you choose? 

In this article, we’ll explore the differences, advantages, disadvantages, pricing models, and costs to help you make the best decision for your project. Keep reading and find out which WhatsApp API makes the most sense for your business!

Types of WhatsApp available on the market: discover the options

types of whatsapp available in the market

Before we talk about WhatsApp APIs, it is important to understand the three main types of WhatsApp available:

Personal WhatsApp

WhatsApp Personal is the traditional version of the app, used by billions of people around the world. Intended for individual users, it does not include business-oriented features or automation.

WhatsApp BusinessVersion 

Version aimed at small and medium businesses. This version has features such as a product catalog, automatic messages and business profiles, but still relies on manual interactions. 

Furthermore, it allows the simultaneous use of two numbers on the same device, one in the personal application and the other in the Business application, in a completely legal manner and in line with Meta's guidelines.

WhatsApp Business API

Unlike previous versions, WhatsApp Business API is not an application, but a cloud-based solution that allows WhatsApp integration to different systems, enabling automation and personalization of interactions.

Companies that manage a large volume of messages use this API to optimize communication with customers, ensuring efficiency and scalability. With this solution, it is possible to:

  • automate the sending of messages and notifications;
  • to create chatbots for customer service;
  • integrate WhatsApp with CRMs, ERPs and other business platforms;
  • use artificial intelligence to personalize interactions.

How does the WhatsApp Business API work?

The WhatsApp Business API acts as a bridge between different systems, allowing softwares to communicate automatically. Since it is not an application installed on the cell phone, the entire operation takes place in the cloud, ensuring scalability and reliability for companies that need high-performance communication.

Although initially aimed at developers, today there are several solutions that simplify the implementation of the WhatsApp Business API, making it accessible to companies of different sizes.

Now that we understand the concept, let's explore the differences between the Official WhatsApp API and Unofficial WhatsApp APIs.

Official API vs. Unofficial API: Know the main differences

official api vs unofficial api differences

Businesses can choose between two types of WhatsApp API for integration:

  • Official WhatsApp Business API (provided directly by Meta or licensed companies);
  • Unofficial APIs (provided by third parties, without any connection to Meta, but within the law).

Next, we will understand the main differences between them.

Official WhatsApp Business API

The Official WhatsApp Business API is provided by Meta (Facebook) itself or by licensed companies. Meta recently began offering this service directly to end users, without the need for licensed intermediaries. 

This API can be integrated directly via Facebook's Business Manager (BM), ensuring security and compliance with Meta's policies. Among the main features of the Official API:

  • integration via Facebook Business Manager;
  • mandatory use of pre-approved message templates to start conversations;
  • billing based on conversations initiated;
  • restriction on sending messages outside of Meta's rules;
  • lower risk of blocking, as long as you follow the guidelines/

Please note that Meta does not allow unrestricted sending of messages. To start a conversation, it is mandatory to use approved message templates, ensuring that the contact complies with WhatsApp policies. The template categories are:

  • marketing: promotions, coupons and offers;
  • utility: order confirmations, delivery tracking;
  • authentication: sending verification codes;
  • service: user-initiated messages at no additional cost.

After the first template is sent, the conversation can continue normally for up to 24 hours without the need for a new template.

And how does billing work on the Official API?

The pricing for the Official WhatsApp API is based on conversations initiated and varies depending on the message category:

  • marketing messages: about R$ 0.36 per conversation started;
  • utility messages: approximately R$ 0.04 per conversation initiated;
  • authentication messages: around R$ 0.015 per conversation initiated;
  • client initiated messages: at no additional cost.

Other important points about billing include the 24-hour validity for each conversation initiated by the company, which means that if it is necessary to continue the interaction after this period, a new paid template will be required. 

Additionally, starting in April 2025, authentication and utility messages sent within this 24-hour window will no longer be charged.

Unofficial APIs

Unofficial APIs are solutions offered by third parties, with no direct relationship with Meta. Although they are not licensed, many of these APIs are completely legal and follow security standards. The main characteristics of Unofficial APIs include: 

  • simplified integration via QR Code;
  • allows sending messages without the need for pre-approved templates;
  • fixed price per integrated WhatsApp number;
  • greater flexibility for shipping and automation;
  • higher risk of ban in case of spam or inappropriate use.

Unlike the Official API, which requires template approval and follows strict rules, Unofficial APIs allow messages to be sent freely, without category restrictions or prior approval. This allows for more dynamic contact with customers, ideal for companies that need freedom in communication.

And how does the billing work? Unofficial APIs?

The pricing of Unofficial APIs varies depending on the provider. Some operate with fixed monthly plans, while others charge per connected WhatsApp number.

  • some companies offer plans starting from R$99 per integrated WhatsApp number;
  • others offer packages for multiple numbers, reducing the cost per account;
  • There are open-source options, which can be used free of charge, but require their own infrastructure.

Despite the freedom offered by Unofficial WhatsApp APIs, it is essential to consider the risks involved. Since there is no direct link to WhatsApp, these APIs are more prone to blocking, especially when used for mass sending without the proper consent of users.

Furthermore, Meta support and warranty are not available, which means that any technical issues or blockages will depend solely on the API provider.

Sending messages without the recipients' authorization can also result in restrictions, compromising the company's continued communication with its customers.

So which API to choose?

which whatsapp api to choose

Choosing between the Official WhatsApp API and Unofficial WhatsApp APIs depends on your business needs. While the Official API provides greater security and compliance, Unofficial APIs offer more freedom and predictable costs.

Evaluate your options based on your message volume, need for automation, and level of risk you are willing to take.

To learn more about automation and other efficient strategies for integrate chatbots, automatic notifications and artificial intelligence to your business, explore more at our YouTube channel and in the NoCode StartUp website.

Artificial intelligence is transforming the way we interact with technology, and AI agents are one of the most powerful advancements in this area. However, to make these agents truly effective, it’s essential to train them with data specific to your business.

In this article, we will explore how to create an AI agent using the RAG technique (Retrieval-Augmented Generation) to train models with custom information. You will learn three practical ways to implement this in your own project. 

Ready? Happy reading! 

What is an AI agent and how does it work with RAG?

What is an AI agent and how does it work?

Before we get into the practical part, it is important to understand the concept of an AI agent and how it can be improved using RAG.

Basically, an AI agent is a system that can interpret commands, process information, and generate responses autonomously. To do this, it needs three fundamental elements:

  • AI model: the agent is based on models such as GPT, Llama or Claude, responsible for interpreting and generating text based on learned patterns;
  • Base prompt: these are the instructions that define how the agent should behave and structure its responses;
  • memory: essential for AI to remember previous interactions. Some agents have both short-term and long-term memory, allowing the conversation to continue.

In addition to these features, an AI agent can be even more efficient when using the RAG (Retrieval-Augmented Generation) technique, as we mentioned earlier. This means that, instead of relying exclusively on the model's prior knowledge, it can query external databases, such as documents, PDFs, Notion pages, or spreadsheets. 

In this way, an agent trained with RAG becomes an expert in specific content, ensuring more precise and contextualized responses.

Method 1: Creating an agent with Dify

method 1 creating an agent with dify

Now that you understand the basics, let's get to the practical part: how to create an AI agent trained with your own data!

One of the easiest and most effective ways to create a RAG-trained agent is by using Difyi. This tool allows you to integrate knowledge bases into your assistant quickly and intuitively.

To train your agent at Dify, follow the step by step below:

  • access the “Knowledge Base” tab within the Dify platform;
  • upload your documents, such as PDFs, HTML files, spreadsheets or web pages;
  • Dify processes the files and transforms them into numeric vectors, converting the textual content into a format that AI can interpret efficiently.

This process is known as embedding, in which the tool structures the data on a vector basis, allowing the AI to search and retrieve the most relevant information whenever a question is asked.

Additionally, Dify makes it easy to create virtual databases by organizing knowledge into chunks of information. This way, when a user asks the agent a question, the agent quickly identifies which chunk of text best fits the desired answer.

With Difyi, you can create specialized agents for different purposes, such as:

  • customer support assistants, who access FAQs and technical manuals;
  • customer service chatbots, which answer questions about products and services;
  • sales agents, which use strategic information to personalize approaches.

The best part? Dify automates this entire process behind the scenes, making implementation simple and practical.

Method 2: Creating an agent with OpenAI Assistants and RAG

method 2 creating an agent with openai assistants

Another efficient way to train an AI agent with RAG is to use OpenAI Assistants. This solution allows you to create custom assistants, define specific behaviors, and incorporate documents so that the AI can query and respond accurately.

Unlike Dify, which automates much of the process, OpenAI offers greater control over the agent’s settings. To create your assistant using this tool, follow the steps below:

  • access the OpenAI platform and go to the “Assistants” tab;
  • create a new wizard, defining a name, description and specific instructions;
  • choose an AI model, such as GPT-4 Turbo, to ensure more complete and contextual answers;
  • Upload files that he will use as reference, such as technical manuals, internal documents, or knowledge bases.

When documents are added to the platform, OpenAI transforms this content into a vector database. This way, the agent can consult the information whenever necessary, without relying solely on the model's pre-trained knowledge. 

This allows it to provide more personalized and up-to-date responses without requiring a complete AI re-processing. Additionally, OpenAI manages all the infrastructure needed to store and retrieve this information, making it easy to implement for those who don’t want to set up their own database.

One of the main advantages of this approach is its ease of implementation, as OpenAI takes care of the technical part, making the process simple and intuitive. In addition, the model guarantees high accuracy, combining the power of GPT-4 Turbo with specific information about your business, making the assistant much more effective. 

If your goal is to create a specialized AI agent without having to set up an advanced technical environment, OpenAI Assistants can be a great choice.

Method 3: Creating an agent with N8N and Supabase

method 3 creating an agent with n8n and supabase

The third way to create an AI agent trained with RAG is by using the integration between N8N and Supabase. This approach allows greater control over the data and optimizes the search for relevant information within the vector database.

While tools like Dify and OpenAI Assistants simplify the process, using N8N in conjunction with Supabase offers more versatility and reduces operational costs by allowing the framework to be fully configured and managed within your own environment.

To create an AI agent trained with this combination, follow the steps below:

  • configure the vector database in supabase to store the reference documents;
  • upload the files that the agent will use as a knowledge base, such as manuals, FAQs or technical ebooks;
  • integrate Supabase with N8N to enable AI to query data and provide contextualized answers;
  • develop automated flows in N8N to structure agent interactions with users;
  • optimize agent responses by ensuring that they can access the most relevant blocks of information within the database.

But why use N8N and Supabase? with RAG?

Unlike other solutions, this approach allows for an advanced level of customization and control over the vector database. When a user asks the agent a question, it fetches the most relevant vector of data from Supabase, ensuring that the answer is based on the stored documents.

Additionally, N8N allows you to connect the AI agent to different applications, such as Whatsapp, Slack and Google Drive, expanding the possibilities of use and automation. This flexibility makes the model ideal for companies that need a highly specialized agent.

Among the main advantages of this implementation, the following stand out:

  • greater control over datas, allowing adjustments and customizations as needed;
  • cost reduction, as Supabase replaces paid solutions for vector storage;
  • advanced automation, with intelligent flows and integrations in N8N;
  • scalability, allowing the knowledge base to grow according to business needs;
  • greater efficiency, as the agent accesses information directly from the vector database, without relying solely on the AI model.

If you are looking for flexibility and cost reduction, N8N + Supabase is a powerful solution for training specialized AI agents with RAG.

Conclusion

Training an AI agent with your own data is an essential strategy for obtaining more accurate responses aligned with the context of your business. With RAG, you can transform internal files and documents into structured knowledge for AI, optimizing processes and improving the user experience.

If you want to dive deeper into the topic and learn how to create your own AI agents, check out the complete N8N course at NoCode Startup and take your automation to the next level!

NEWSLETTER

Receive exclusive content and news for free

premium WordPress plugins
en_USEN
menu arrow

Nocodeflix

menu arrow

Community