Step by Step Guide to Integrate Official WhatsApp API into N8N
5 min
The Official WhatsApp API is a powerful solution for businesses that want to automate their interactions via WhatsApp. In this article, you will learn how to configure and integrate the Official WhatsApp API using N8N, one of the best NoCode tools for automation. Read on to find out:
How to create a number in Meta to use the Official WhatsApp API;
How to send your first automated message;
How to set up triggers and automations to interact with incoming messages;
How to connect WhatsApp API to N8N, creating intelligent automation flows.
If you are looking for an efficient and practical way to integrate WhatsApp into your automation routine, this guide is for you. Happy reading!
Official WhatsApp API: Learn the complete integration guide on N8N
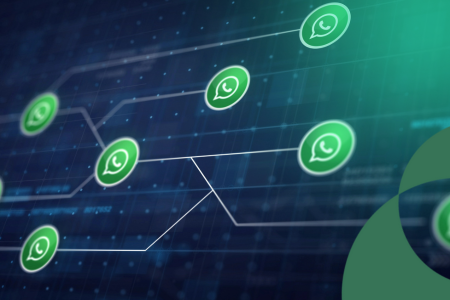
The Official WhatsApp API allows you to connect WhatsApp to any system, whether it is your own or integrated with automation tools. However, how do you configure this API correctly? And, furthermore, how do you create intelligent automated communication flows? See below a step-by-step guide on how to put this into practice!
Step 1: Creating an application in Meta
To use the Official WhatsApp API, the first step is to create an application on Meta. This will ensure that your integration works correctly on N8N and other automation tools. So, how can you ensure that everything is set up correctly and also avoid integration errors? Follow the steps below:
Create a new application in the panel, selecting the Business option and filling in the necessary data;
Configure the Official WhatsApp API by accessing the WhatsApp section and clicking on Setup;
Associate a verified Business Manager, essential for the API to work;
Use a valid phone number that is not already registered with WhatsApp.
That's it! Now you've finished creating your app and can configure the API. From there, you can, for example, send your first automated message!
Step 2: Sending the first message on the Official WhatsApp API
Now that you have completed creating your application, it is time to test the Official WhatsApp API and send your first automated message. To do this, we follow some essential steps to configure the environment and ensure that communication occurs correctly.
Generate an access token in the Official WhatsApp API dashboard. You will need this token to authenticate the messages you send;
Select a test number that Meta provides or register a new one, ensuring that it is not already registered on WhatsApp;
Get the account ID of the WhatsApp Business and the phone number ID within the Meta dashboard;
Use cURL, Client URL, (or other HTTP request tool) to send the first test message;
Finally, check the delivery of the message on your WhatsApp. Typically, the initial template sent is usually the “Hello World” template, previously approved by Meta.
Please note that the Official WhatsApp API requires that the first message sent to a user be a Meta-approved template. Additionally, after the user replies, the conversation remains open for 24 hours, allowing you to send personalized messages.
Now that your first message has been sent successfully, we move on to the next step: configuring the integration of the Official WhatsApp API with N8N!
Step 3: Integrating Official WhatsApp API with N8N for automation
Now that we have sent the first message on the Official WhatsApp API, it is time to integrate it with N8N to create intelligent automation flows. N8N is one of the most efficient NoCode tools for connecting systems and automate processes in a practical way.
So, how can you ensure that this integration is done correctly? Don't worry, it's simpler than it seems! To do this, just follow the steps below:
Create a new flow and add a manual trigger to start the automation;
Click on “+” and select Trigger Manual to run the flow manually in the tests;
Add the WhatsApp node and select the “Send Message” option;
Go to Credentials and enter the Access Token generated in the WhatsApp API panel and the WhatsApp Business account ID obtained in Meta;
Choose the phone number that will be used to send automated messages;
Configure the message (text, image, button, etc.);
Run the test flow and verify that the message was sent correctly.
With this configuration, your WhatsApp can now send messages directly from N8N, automating interactions and optimizing your company's communication!
But how does this work behind the scenes? For the message to be sent properly, it is first important to understand the structure of the API.
Understand more about the API structure
All communication between systems via API follows a predefined structure. In contrast, specifically in the case of the Official WhatsApp API, this communication occurs via HTTP requests — usually of the POST type for sending messages. Furthermore, these requests contain three main parts:
API URL: the main address that receives requests;
Headers: information such as the content type (Content-Type: application/json) and the authentication method (Authorization: Bearer );
Body (request body): the JSON structure containing the data sent.
With this understanding, it becomes much easier to configure the API correctly within the N8N. Node done, it's time to move on to the next step to create automated responses with Webhooks in the Official WhatsApp API!
Step 4: Creating automated responses with Webhooks in the Official WhatsApp API
Once we configure the sending of automated messages via the Official WhatsApp API in N8N, the next step, in turn, will be to create automatic responses whenever a user interacts with the company's WhatsApp.
To do this, we will use Webhooks, which allow us to capture events and trigger automation flows in real time.
They work as automatic triggers, firing events whenever interactions occur on WhatsApp. In turn, in the case of the Official WhatsApp API, these Webhooks are triggered as soon as a message arrives and then send the data to N8N for processing.
With this functionality, therefore, you can automate interactions such as:
Quick responses for customers;
Integration with systems such as CRMs and ERPs;
Automated support ticket generation;
Sending personalized messages based on user interaction.
To capture messages received on WhatsApp and trigger automations on N8N, follow the step by step below:
Access N8N and create a new automation flow.
Click on “+” and add a WhatsApp trigger node.
Select the “onMessage” option to capture incoming messages.
Configure a new credential by entering:
Client ID and Client Secret, obtained from Meta for Developers.
Webhook URL automatically generated by N8N.
From your Meta dashboard, go to Settings > Webhooks and:
add the Webhook URL generated in N8N as Callback URL.
define the events to be monitored (e.g. received messages).
Click Verify and Save to activate the Webhook.
Run a test by sending a message to the linked WhatsApp.
In N8N, confirm that the message was captured and processed correctly.
Conclusion
By now, you should have learned how to integrate the Official WhatsApp API with N8N allows you to efficiently automate communication processes, connecting WhatsApp to internal systems, CRMs, ERPs and other platforms.
Now that you've learned how to integrate the Official WhatsApp API with N8N, how about taking advantage of this time to deepen your knowledge and explore the automation possibilities even further?
Therefore, in the NoCode Startup N8N course, you will have access to complete and practical training on automation and data integration, and thus be able to make your company even more efficient.
Neto specialized in Bubble due to the need to create technologies quickly and cheaply for his startup. Since then, he has been creating systems and automations with AI. At the Bubble Developer Summit 2023, he was listed as one of the greatest Bubble mentors in the world. In December, he was named the largest member of the global NoCode community at the NoCode Awards 2023 and first place in the best application competition organized by Bubble itself. Today, Neto focuses on creating AI Agent solutions and automations using N8N and Open AI.
If you are looking for a Free AI Agent Course for Beginners, you have come to the right place! After all, we are in the era of automation and artificial intelligence. In this context, companies and professionals are looking, above all, for intelligent solutions to optimize processes. In addition, they are looking to reduce costs and, consequently, improve the user experience.
In this context, AI agents stand out for their ability to automate complex tasks, interact naturally with users and integrate multiple systems without the need for constant supervision.
Continue reading this article and discover how the Free AI Agent Course can transform the way you work with artificial intelligence. Understand why AI agents are so powerful and learn how to start creating your own agent from scratch, using accessible and efficient tools, without needing any programming experience. Enjoy your reading!
From Zero to AI Agent: Learn how it works Free AI Agent Course for Beginners
If you want to learn for free and create your own AI Agent, the first step is to learn about the structure of the Free AI Agent Course for Beginners from NoCode Startup. If you want to start from scratch and develop your own Artificial Intelligence Agent, this content was made for you, in a complete material you will learn:
fundamentals of Artificial Intelligence Agents to build a solid foundation;
a step-by-step guide to creating practical agents, even without prior experience;
integrations with platforms such as Telegram, enabling the creation of interactive and dynamic agents.
Remember that the AI Agent course was developed so that anyone, even without prior programming knowledge, can create intelligent and scalable solutions. In other words, even if you have never programmed before, you can start without fear!
Why are AI agents so powerful?
Before understanding how to create your own AI Agent, it is essential to understand why these tools have become indispensable in different sectors. Therefore, it is worth reflecting: why is the use of these solutions growing so much? How do they impact the efficiency of processes?
Furthermore, understanding these aspects can reveal new opportunities for optimization and growth.
1. Integration with custom data (RAG)
One of the main reasons for the power of AI agents lies in the technique known as RAG (Retrieval-Augmented Generation). This methodology allows the AI model to be combined with personalized user or company data. This means that the agent can be trained to access specific information from:
PDF files;
corporate websites;
spreadsheets and databases;
Through this customization, the agent becomes able to perform advanced queries, access specific documents and respond accurately based on the available information.
2. Ability to execute actions (Function Calling)
In addition to RAG, another distinguishing feature of AI agents is the function called Function Calling (or tools), which allows the agent to not only analyze data, but also perform actions on different platforms. For example, among the main functions, the following stand out:
access and edit the calendar (schedule meetings, check events);
send, read and reply to emails;
interact with spreadsheets and databases (consult and update information);
perform direct tasks via corporate applications.
This capability turns the agent into a true virtual assistant. Imagine being able to send a simple message on WhatsApp, and the agent automatically accesses different systems, queries databases and sends comprehensive reports, all without direct human interaction.
Learn how to create AI Agents for different businesses
AI agents aren’t limited to basic tasks or simple interactions. In the Free AI Agents for Beginners Course, you’ll master tools like RAG and Function Calling and learn how to create intelligent solutions for different industries, without needing technical experience and without paying anything!
Scheduling agents, for example, can automate appointment scheduling, eliminating the need for direct human interaction. Key application examples include:
medical consultations: the agent checks available times, schedules the appointment and sends confirmation to the patient;
barbershops and beauty salons: the agent manages the professionals' schedule and allows clients to choose times directly via WhatsApp or Instagram;
classes and events: Want to schedule an adventure class or special event? The agent automates the process and confirms details with participants;
restaurants and snack bars: the agent acts as an intermediary between the customer and the establishment, optimizing orders and integrating with the restaurant system;
e-commerces: manage orders, inventory and customer service in an automated way, using agents integrated with the main sales platforms;
veterinary clinics: allow appointment scheduling, vaccination control and automatic notifications for customers;
gyms and studios: the agent manages class reservations, waitlists and sends automatic reminders to students.
Understand the Architecture of an AI Agent
Creating an AI Agent is more than just programming a chatbot. It’s about developing an intelligent, autonomous solution that transforms processes!
To do this, it is essential to understand the architecture that supports these agents, ensuring that they are capable of performing complex tasks, interacting with different platforms and delivering accurate and contextualized responses.
Below, learn more about this framework and how each component contributes to the advanced performance of AI agents.
Input Layer: where the agent receives information from the user through different channels (WhatsApp, Instagram, email or website), whether in text, voice or specific commands;
natural language processing (NLP): responsible for interpreting messages, understanding intentions and extracting relevant information, such as dates, times and user preferences;
connectors and APIs (Function Calling): allow the agent to perform real actions, such as checking available times, consulting menus or accessing internal systems, through external integrations;
RAG (Retrieval-Augmented Generation): combines natural language generation with external data retrieval, allowing the agent to search for information in databases or on the internet in real time before responding;
decision making and automation: After processing the information, the agent performs actions such as scheduling appointments, forwarding orders or sending notifications;
real-time feedback: keeps the user informed about the status of the service, sending automatic updates at each stage of the process.
N8N: The most complete tool for creating AI agents
n8n complete tool to create AI agents
Creating AI agents goes far beyond just setting up simple bots. There are robust tools on the market that allow you to build complex, interactive, and fully automated agents. Choosing the right tool makes all the difference in the performance and possibilities of your project.
In this way, the N8N stands out for integrating two essential worlds: advanced automation and creation of AI agents.
Originally designed for complex automation, the platform has evolved and today offers a powerful framework for creating intelligent and scalable agents. Among the main differentiators of N8N are:
creation of complex automations and integrations on a single platform;
integration with multiple AI models such as GPT, Llama, Claude and Gemini;
ability to host the system on your own servers, reducing costs;
intuitive interface with support for the “No-Code” concept, ideal for beginners'
integration with external tools such as calendars, spreadsheets, emails and databases.
Additionally, N8N offers a visual interface for creating automation flows, making the job easier even for those with no prior programming experience. And best of all, you can take a 14-day free trial with credits included to use OpenAI's resources.
OpenAI: Simplicity and Scalability
OpenAI offers one of the most robust solutions on the market, enabling the creation of powerful AI agents through the use of GPT models (such as GPT-4).
With a simple-to-use API and excellent documentation, OpenAI has become a reference for developers who want to create scalable agents with high processing capacity. Among its main advantages are:
pre-trained models with high natural language understanding capacity;
easy integration with platforms like N8N;
scalability for projects of all sizes;
support for techniques such as RAG and Function Calling;
Dify: Open source and total flexibility
Dify stands out for being 100% open source, allowing developers to have complete freedom to adapt the agent according to their needs. Dify's main features are:
open source, allowing complete customizations;
possibility of hosting on own servers, reducing expenses;
broad integrations with databases, APIs and external tools;
But how do you choose the ideal tool? Choosing the ideal tool will depend on your goals and the level of complexity of your project:
If you are looking for something practical and scalable, OpenAI may be the best choice;
for those who need advanced automations and complex integrations, N8N stands out;
If the focus is total freedom of customization and an open source solution, Dify is perfect.
And if your goal is to create complex automations with multiple integration points, N8N is the best choice. Its ability to combine automations with AI and the possibility of self-hosting make it one of the most powerful tools on the market.
Time to get your hands dirty: learn how to create your first AI Agent
If you've followed the Free AI Agent Course for Beginners | From Zero to AI Agent, it's time to put everything you've learned into practice! In this step, I'll guide you through the process of creating your first AI Agent, using accessible and efficient tools, such as N8N, OpenAI and Dify. Ready? Let's go!
1. Step 1: Defining your AI Agent front-end
The front-end is the interface of your project, the point of contact where the user interacts with your agent. In this content, we will use Telegram for its simplicity and versatility. Although it is possible integrate WhatsApp, this platform's API demands more complex processes.
So, for beginners, Telegram is the best choice. Later, you can explore the integration with WhatsApp.
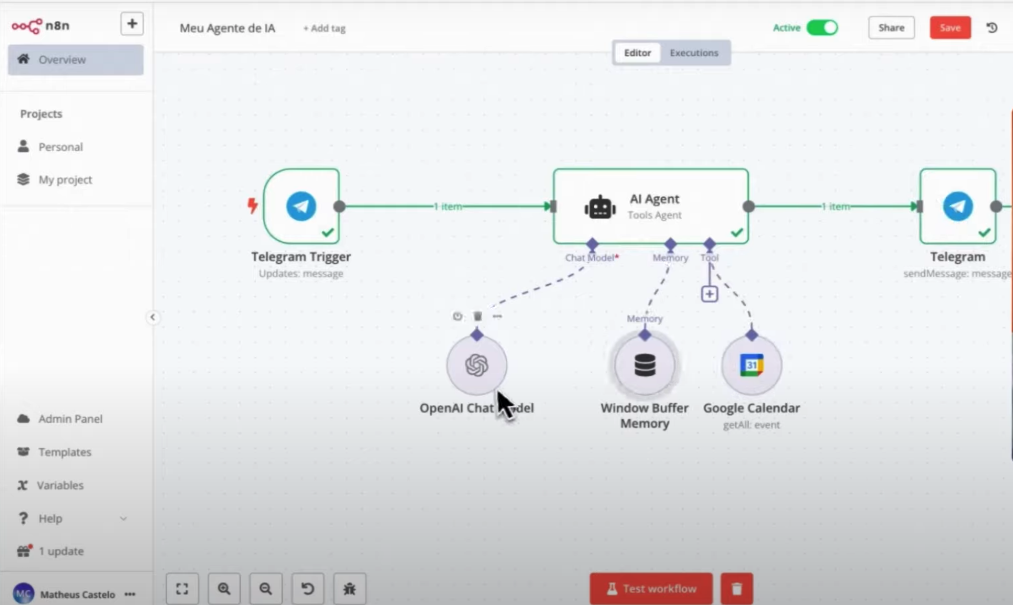
2. Creating the Agent in N8n
N8N will be the main automation tool in your AI Agent. With it, you can create complex workflows without the need for advanced programming. Follow the steps below to get started:
create your free account on N8N with a 14-day free trial and credits to use the OpenAI API;
access the N8N panel and configure your credentials;
create a new workflow by clicking on “Start from scratch”;
choose your first trigger (e.g.: message received on Telegram);
add the “AI Agent” node and connect to the OpenAI GPT model.
3. Expanding the functionalities
Now that your basic AI Agent is up and running, it's the perfect time to enhance its capabilities, making it even more efficient and versatile!
Learn how to add advanced functionality that allows your agent to interact with different types of data, integrate new platforms, and provide a richer user experience.
1. Adding memory layer (WindowBufferMemory
For your AI Agent to have the ability to remember information during a conversation and maintain context between messages, it is essential to add a memory layer.
The implementation of WindowBufferMemory in N8N allows the agent to store recent interactions, ensuring more accurate responses aligned with the context of the dialogue. To implement, follow the steps below:
In N8N, add the WindowBufferMemory node to your agent flow.
configure the following parameters:
Window Size: define the number of messages the agent should remember (e.g.: 5 previous interactions);
storage method: For temporary storage, use N8N's default storage. For long-term storage, integrate with databases like Redis or Supabase;
Connect the WindowBufferMemory node to your AI Agent node so that the agent uses the history when generating responses.
To make the implementation clearer, imagine the following scenario: the user asks “What’s my appointment tomorrow?” and then simply writes “What about Friday?”.
Even without repeating the full question, the agent understands that the context is still about commitments and provides the correct answer.
Now that the agent is prepared to store contextual information, you can explore additional integrations and enhance its functionality, creating a more robust and efficient flow.
2. Integration with multiple tools (Function Calling)
To take your AI Agent to the next level, allow it to interact directly with other platforms and perform complex tasks. With Function Calling, the agent not only answers questions, but also performs practical actions across different systems. Key features you can integrate include:
Google Calendar: automatically schedule and list events;
Spreadsheets (Google Sheets/Excel): add, remove or search data in real time;
External APIs: perform queries on third-party services, such as weather forecasts, currency quotes or traffic information.
To set up these integrations, follow the steps below:
in N8N, add the node corresponding to the service you want to integrate (e.g. Google Sheets or Google Calendar);
In AI Agent, use the Function Calling function to enable the execution of automatic actions when certain commands are detected;
Create specific prompts to activate each tool, ensuring that the agent understands the user's requests. Practical examples:
“schedule a meeting for tomorrow at 2pm.”
“add the client João Silva to the contact spreadsheet.”
“send a confirmation email to [email@example.com].”
In this way, the agent becomes not only an intelligent assistant, but also an executor of complex tasks, expanding its functionalities and delivering a much richer and more dynamic experience to the user.
3. Implementing sentiment analysis
You can also enhance your AI Agent’s communication by empowering it to interpret the emotional tone of user messages and adjust its responses accordingly. This ability creates a more humanized, empathetic, and contextualized interaction.
To do this, follow the steps to implement sentiment analysis:
in N8N, add the Text Analytics node or use external APIs like Google Natural Language or IBM Watson;
connect the node to the main flow of the agent, right after receiving the user's message;
configure the node to identify emotions such as happiness, anger, sadness, or neutrality;
In the AI Agent node, create branches in the flow to adapt the agent's responses based on the identified sentiment.
If the user types, “I’m very frustrated with the service,” the agent might respond with more empathy: “I’m sorry to hear that! I’ll do my best to help you resolve the issue as quickly as possible.”
This way, the agent becomes more attentive, improving the user experience and strengthening the bond of trust.
4. Transforming audio into text (Speech-to-Text)
You can also expand your AI Agent’s accessibility by enabling it to understand voice messages. Speech-to-Text functionality allows the agent to transcribe audio into text and interact normally with the user.
To enable audio transcription in N8N, follow these steps:
add Telegram Get File node to capture the audio file sent by the user;
connect the node to OpenAI's Whisper API or Google Speech-to-Text to perform audio-to-text transcription;
send the transcribed text to the AI Agent node so that the agent can process and respond to the command normally.
With voice message understanding enabled, the user can send an audio message saying: “Schedule a meeting with Pedro tomorrow at 10 am.” The agent transcribes the audio and executes the action on the calendar, ensuring a fluid and efficient interaction.
This functionality expands the agent's possibilities of use and creates a more dynamic service experience.
5. Automatic notifications and real-time alerts
How about taking your AI Agent to a new level of efficiency with RAG (Retrieval-Augmented Generation), allowing it to search for data from external sources before generating responses? With this technique, the agent provides updated information and contextualized responses. To do this, follow these steps to configure RAG:
in N8N, add the integration node with databases, external documents (PDFs) or public APIs;
In the AI Agent prompt, instruct the agent to query external sources before generating a response to the user;
test the agent with questions that require consultation in external databases.
By adding this automation, your AI Agent gains the ability to send personalized reminders like “You have a meeting scheduled for tomorrow at 9am.”, important announcements like “There’s been a change to Friday’s event.”, and strategic promotional messages like “Unmissable offer! Up to 30% off today.”
With RAG, the agent stops being just a text generator and becomes an intelligent, real-time query tool, ideal for corporate, educational and financial sectors.
Finally, you can take your AI Agent to the next level of efficiency by implementing RAG. To set up RAG on N8N, follow these steps:
add the integration node with databases, external documents (such as PDFs) or public APIs;
configure the AI Agent prompt to instruct it to perform external queries before formulating the response to the user;
take practical tests with questions that require searching for data in real time, such as:
“What was the revenue from the last quarter?” (consulting a database);
“What is the dollar rate today?” (using financial APIs).
This feature is especially useful in corporate, educational, and financial environments where decision-making depends on accurate, timely data.
4. Testing and adjustments
Now that your agent is up and running, it’s time to test it and tweak any details to improve its performance. You can use a testing checklist to check if your agent is working properly:
Is the agent receiving messages correctly?
does it respond based on the prompt instructions?
Can you create and list events in the calendar?
Are the answers clear and accurate for the user?
If the agent is returning incorrect information, adjust the prompt to better guide responses. You can also use N8N's execution history to identify failures and test the agent with different commands to validate its flexibility.
Conclusion
By now, you’ve probably realized that creating AI Agents isn’t just a technological trend, right? Quite the opposite, it’s a real opportunity to explore new markets, automate processes and, above all, boost business in a strategic and efficient way.
Whether to improve the customer service, optimize internal flows or create scalable SaaS solutions, agents offer versatility and scalability for professionals and companies.
The best thing of all is that with No Code tools Like N8N, anyone can start this journey, even without prior programming experience. The combination of techniques such as RAG and Function Calling allows you to create powerful agents, capable of acting in different sectors and solving complex problems.
Now is the time to learn for free and get your hands dirty! In the Free AI Agent Course for Beginners, you start from scratch and create your own intelligent agent, ready to automate tasks and generate business opportunities.
The WhatsApp API is one of the main solutions for companies that want to scale their customer service and communication automation.
WhatsApp, being one of the most popular messaging apps in the world, allows direct and efficient interactions with customers. However, when it comes to automation and integration, using the WhatsApp API becomes essential.
So, there are two main options for this integration: the Official WhatsApp Business API and the Unofficial APIs. But which one should you choose?
In this article, we’ll explore the differences, advantages, disadvantages, pricing models, and costs to help you make the best decision for your project. Keep reading and find out which WhatsApp API makes the most sense for your business!
Types of WhatsApp available on the market: discover the options
Before we talk about WhatsApp APIs, it is important to understand the three main types of WhatsApp available:
Personal WhatsApp
WhatsApp Personal is the traditional version of the app, used by billions of people around the world. Intended for individual users, it does not include business-oriented features or automation.
WhatsApp BusinessVersion
Version aimed at small and medium businesses. This version has features such as a product catalog, automatic messages and business profiles, but still relies on manual interactions.
Furthermore, it allows the simultaneous use of two numbers on the same device, one in the personal application and the other in the Business application, in a completely legal manner and in line with Meta's guidelines.
WhatsApp Business API
Unlike previous versions, WhatsApp Business API is not an application, but a cloud-based solution that allows WhatsApp integration to different systems, enabling automation and personalization of interactions.
Companies that manage a large volume of messages use this API to optimize communication with customers, ensuring efficiency and scalability. With this solution, it is possible to:
automate the sending of messages and notifications;
integrate WhatsApp with CRMs, ERPs and other business platforms;
use artificial intelligence to personalize interactions.
How does the WhatsApp Business API work?
The WhatsApp Business API acts as a bridge between different systems, allowing softwares to communicate automatically. Since it is not an application installed on the cell phone, the entire operation takes place in the cloud, ensuring scalability and reliability for companies that need high-performance communication.
Although initially aimed at developers, today there are several solutions that simplify the implementation of the WhatsApp Business API, making it accessible to companies of different sizes.
Now that we understand the concept, let's explore the differences between the Official WhatsApp API and Unofficial WhatsApp APIs.
Official API vs. Unofficial API: Know the main differences
Businesses can choose between two types of WhatsApp API for integration:
Official WhatsApp Business API (provided directly by Meta or licensed companies);
Unofficial APIs (provided by third parties, without any connection to Meta, but within the law).
Next, we will understand the main differences between them.
Official WhatsApp Business API
The Official WhatsApp Business API is provided by Meta (Facebook) itself or by licensed companies. Meta recently began offering this service directly to end users, without the need for licensed intermediaries.
This API can be integrated directly via Facebook's Business Manager (BM), ensuring security and compliance with Meta's policies. Among the main features of the Official API:
integration via Facebook Business Manager;
mandatory use of pre-approved message templates to start conversations;
billing based on conversations initiated;
restriction on sending messages outside of Meta's rules;
lower risk of blocking, as long as you follow the guidelines/
Please note that Meta does not allow unrestricted sending of messages. To start a conversation, it is mandatory to use approved message templates, ensuring that the contact complies with WhatsApp policies. The template categories are:
marketing: promotions, coupons and offers;
utility: order confirmations, delivery tracking;
authentication: sending verification codes;
service: user-initiated messages at no additional cost.
After the first template is sent, the conversation can continue normally for up to 24 hours without the need for a new template.
And how does billing work on the Official API?
The pricing for the Official WhatsApp API is based on conversations initiated and varies depending on the message category:
marketing messages: about R$ 0.36 per conversation started;
utility messages: approximately R$ 0.04 per conversation initiated;
authentication messages: around R$ 0.015 per conversation initiated;
client initiated messages: at no additional cost.
Other important points about billing include the 24-hour validity for each conversation initiated by the company, which means that if it is necessary to continue the interaction after this period, a new paid template will be required.
Additionally, starting in April 2025, authentication and utility messages sent within this 24-hour window will no longer be charged.
Unofficial APIs
Unofficial APIs are solutions offered by third parties, with no direct relationship with Meta. Although they are not licensed, many of these APIs are completely legal and follow security standards. The main characteristics of Unofficial APIs include:
simplified integration via QR Code;
allows sending messages without the need for pre-approved templates;
fixed price per integrated WhatsApp number;
greater flexibility for shipping and automation;
higher risk of ban in case of spam or inappropriate use.
Unlike the Official API, which requires template approval and follows strict rules, Unofficial APIs allow messages to be sent freely, without category restrictions or prior approval. This allows for more dynamic contact with customers, ideal for companies that need freedom in communication.
And how does the billing work? Unofficial APIs?
The pricing of Unofficial APIs varies depending on the provider. Some operate with fixed monthly plans, while others charge per connected WhatsApp number.
some companies offer plans starting from R$99 per integrated WhatsApp number;
others offer packages for multiple numbers, reducing the cost per account;
There are open-source options, which can be used free of charge, but require their own infrastructure.
Despite the freedom offered by Unofficial WhatsApp APIs, it is essential to consider the risks involved. Since there is no direct link to WhatsApp, these APIs are more prone to blocking, especially when used for mass sending without the proper consent of users.
Furthermore, Meta support and warranty are not available, which means that any technical issues or blockages will depend solely on the API provider.
Sending messages without the recipients' authorization can also result in restrictions, compromising the company's continued communication with its customers.
So which API to choose?
Choosing between the Official WhatsApp API and Unofficial WhatsApp APIs depends on your business needs. While the Official API provides greater security and compliance, Unofficial APIs offer more freedom and predictable costs.
Evaluate your options based on your message volume, need for automation, and level of risk you are willing to take.